Puerco De Salsa Y Pimiento

OK–this isn’t a brand-spanking new recipe. It’s a variation of our Desayuno de Cinco de Mayo. But, it was so yummy, I couldn’t resist sharing.

Last night before bed, Brent and I laid out our plans for today. Dorks? Yes, and no. 😉 Today is a busy day. Brent has work, 9 a.m. to 6 p.m. Meanwhile, I need to get laundry done, return a couple of blouses that I bought in a rush and don’t fit right, write up (or, at least, draft) a whole bunch of these blog posts because we’ve been slacking lately, and pack us up for our visit his parents for the first time in their new home (we’ll leave immediately after he gets off work and stay overnight with them so we can celebrate Fathers’ Day and visit a farm near them tomorrow). Plus, I have plans to meet with one of my gal pals for a few hours this afternoon. Oh, and of course, there’s the daily stuff of cleaning dishes, giving our dog plenty of outside play time, and maybe–just maybe–if there’s time, I’ll mow the lawn.

So, last night, we agreed, we needed a hearty breakfast this morning and we were kind of tired of eggs. (Have I ever mentioned that we eat eggs almost daily? Yep, and we recently learned that too much of any one food product can actually cause your body to become allergic to it. Can you believe that?! So we really ought to mix things up more often, even if it’s only for our tastebuds’ sanity.) OK, what did we have other than eggs…?

First, we checked the fridge: Leftovers? Not really… there’s that awesome baked chicken we made the other night (recipe to come soon!) but I really want to save that for lunches. Besides, indian flavors just didn’t sound appealing. One banana… that’s not very hearty, and certainly not enough for two of us. Half an avocado… Some leftover coconut milk… “well, we could make coffee smoothies with that and the banana? But we just did that this morning.” “Yea, let’s having something more substantial.” Three bell peppers–one red, one yellow, and one orange. That could be promising. Three lemons and a partial lime… Onions… plenty of those. Salsa, mustard, coconut amines and a variety of other condiments. Hmmm.

Then, we checked the freezer: Ground beef… a whole leg of lamb… pork chops… chicken thighs… pork tenderloin slices (from his mom, “for sandwiches”). We have a winner! Brent’s idea: Cut the pork slices into strips and cook that up with the onion, one bell pepper, and some salsa. Top it off with the avocado. “It’ll be somewhat like that Cinco De Mayo breakfast.”
So, without adieu, here is! 

Puerco De Salsa Y Pimiento (Salsa and Bell Pepper Pork)

Ingredients

  • 1 yellow bell pepper
  • 1/2 medium onion
  • 4 “sandwich slices” of pork tenderloin (I should have weighed it, but my guess is that, in total, we had about 3/4 lb of pork tenderloin.)
  • 12-13 oz salsa (Nearly a full 16-oz jar; we like, and happen to have in the fridge, Nature’s Promise Chipotle Organic Salsa, but any salsa you prefer should do just fine.)
  • salt, pepper, and ancho chili powder to taste
  • approx.  1 tablespoon of bacon fat (or olive oil, coconut oil, or ghee)
  • 1/2 avocado (or a full one, if you prefer)
Method

  1. Slice the bell pepper and onion. 
  2. Slice the pork tenderloin into strips, then cut each strip in half (or in thirds), so the pieces are not overwhelming.
  3. Sauté the bell pepper and onion in the bacon fat over medium heat.
  4. Once the onion is translucent, remove the bell pepper and onion from the pan and set aside.
  5. Use the same pan to cook up the pork. While it’s cooking (this should only take a couple minutes, depending on the size of your pieces, so keep a close eye on it), sprinkle a little salt, pepper and ancho chili powder over the pork.
  6. Once the pork is cooked, toss the bell pepper and onions back into the pan.
  7. Immediately add the salsa.
  8. Mix it all around and allow it to simmer for 5 minutes.
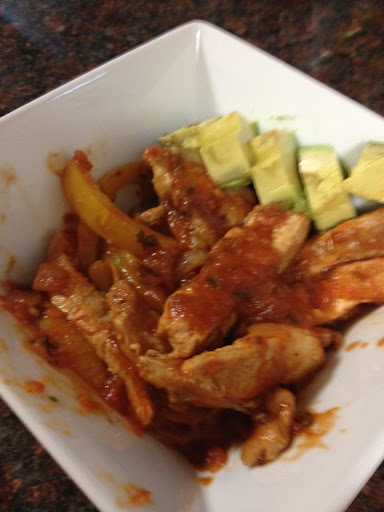
  9. Serve in bowls with avocado sliced or in chunks on top.
  10. Eat up!

The heat from the ancho chili was subtle. The creamy and cool avocado served as a nice foil for the smokey goodness of the chipotle salsa. Plus there’s a great underlying flavor of bacon throughout — courtesy of the yummy bacon fat and pork. 😉
We hope you enjoy this variation. We thought it was delicious! 

Boneless Pork Ribs with Paleo Hoisin Sauce

As we already mentioned in O-M-G we’ve moved to MD, last week and this weekend were full of the moving insanity. So, even though we cooked some Paleo-friendly meals, we fell off the beaten path quite a lot. Thank goodness we’re back to our normal, healthy, Paleo-centered eating this week. I feel so much better than I did last week, and it’s not just because I’m not sore from lifting boxes and furniture anymore.

So, here is one of those delicious Paleo meals from last week…. It’s a spin off Norah’s Asian Boneless Pork Ribs, which we stumbled across while combing the web for something inspiring to do with our boneless pork ribs. We were pleasantly surprised by how tasty this was, especially since we made the hoisin sauce from scratch!

Ingredients

  • 2/3 cup homemade hoisin sauce
  • 1/4 cup pineapple juice
  • 2 tablespoons coconut aminos
  • 2 tablespoons coconut vinegar
  • 2 tablespoons sesame oil
  • 1/2 teaspoon fresh ginger, minced
  • 1 each garlic clove, minced
  • approx. 3 lbs of boneless pork ribs

Method

  1. Preheat the oven to 350 degrees F.
  2. Bake the pork ribs uncovered in a baking dish or pan for 60 minutes.
  3. Meanwhile, wisk the homemade hoisin sauce, pineapple juice, coconut aminos, coconut vinegar, sesame oil, ginger and garlic in a small bowl. Cover with saran wrap and set aside for later.
  4. Once the pork has baked for an hour, take it out and carefully drain the excess grease. (I asked Brent to help me with this–he kept the pork from sliding out with a big flipping spatula while I used oven mits to pick up and tip the pyrex pan until most of the grease drizzled out. Then, I carefully wiped the edges, sides and bottom of the pan to make sure grease wasn’t going to drip off and into our oven.)
  5. Pour the hoisin sauce mixture over the ribs.
  6. Cover the dish completely, then back for another 30 minutes.
  7. Serve and enjoy on it’s own or over a bed of califlower “rice”.
As you can see, our ribs were a little crammed into the baking dish. But it still worked!
The super yummy finished product!

Apple-Stuffed, Bacon-Wrapped Pork Loin Roast

We love meat. We love bacon. It’s just so salty and sweet and oh, so delicious (even when it isn’t perfectly crispy and even when it’s a smidgen burnt). You just can’t go wrong with bacon in my book. 🙂

Last week while Brent’s parents were in town visiting, we made a pork fried “rice” dish (using cauliflower), Health-Bent’s Orange Chicken, our Slow Cooker Chili, PaleOMG’s Honey Ginger Apple Pulled Pork, etc. One of the items that remained was a pound of pork loin roast (we had bought a 3 lb roast but only needed 2 lbs for the recipe). So, two nights ago, I set out to cook it before it went bad in our fridge.

Anyways, I was rummaging through the fridge and pantry for inspiration. I came across bacon and apples. Bingo! Ultimately, this recipe needs some tinkering. The overall flavor was good, but next time I’ll sauté the onions and use a few more spices. I’ll be sure to post the improved recipe once I’ve done it. 🙂

Ingredients

  • 1 1-lb pork loin roast
  • 2 small granny smith apples, cored and chopped
  • 1/2 white onion, chopped
  • 6-8 slices of bacon, uncooked
  • 4-6 cloves of garlic, crushed (just press down with the flat of a knife to crack them open)
  • salt to taste
  • pepper to taste
  • coconut oil, bacon fat, or whatever you prefer to grease the roasting pan/baking dish

Method

  1. Preheat the oven to 350 degrees F.
  2. Season the roast with a sprinkling of salt and pepper.
  3. Cut a pocket into the center of the roast.
  4. Stuff the pocket with about half of the chopped apples, chopped onion, and crushed garlic cloves.
  5. Wrap the roast with the slices of bacon. (I wrapped four across the bottom and up the sides, and then four across the top and down the sides.)
  6. Grease the roasting pan or baking dish.
  7. Bake the roast for 30 minutes.
  8. Add the remaining apples, onion and garlic to the dish, distributing them as evenly as possible around the roast.
  9. Bake for another 30 minutes, or until the pork is cooked through.
  10. Slice, serve and enjoy!

Full disclosure: the 1 lb roast smelled a little funny and there were a few greenish spots on the fat. A lot of people I know would have just tossed the whole thing. I hate wasting food, so I salvaged it. How? Check out my post of safety tips on dealing with these kinds of things.

Safety tips (for proteins)

Be safe, but waste not! If you have protein that’s been sitting in your refrigerator a few too many days, use these quick tips* to make sure it’s safe to eat.  
  • To remove bad smells: Wash in a salt-water bath (or rub with salt and rinse) just before use.
  • To remove small amounts of slime or film: Wash in a salt-water bath (or rub with salt and rinse) just before use.

*Consider throwing out the item if a salt-water bath does not eliminate the smell or remove the slime.

  • Greenish tinted fat: Trim off beef or pork; as long as it’s just a few areas on the fat, the meat will be fine.
  • Black or green meat: If there are many spots or large portions that have turned colors, throw it away. In cases like these, trimming the bad parts and washing in salt water probably won’t be enough to protect you and your family from possible illness.

NOTE: If the meat tastes funy after using any one or more of these tips and after cooking, stop eating it and throw it out immediately. Don’t make yourself sick just to save a few pennies. It’s not worth it.


These are just a few tips brought to you by me, via my dad (a “butcher by trade”). What tips do you have for safely preparing and consuming meat? We’d love to hear from you!

Curried Ground Pork with Carrots and Celery

Last weekend Brent and I bought a couple cookbooks on sale at the local Barnes & Noble, and one of them was called The Curry Bible. Brent and I love food. Yes, we eat Paleo more and more frequently; but we love food, all kinds of it. Curry is one of my favorite things to eat out. All this Paleo business has kept us from going out to eat. Now, that’s awesome because we’re saving big money not eating out. But it’s a little less awesome because we’re not going out to eat for some of our favorite things (like curry!).

So, this weekend, despite being insanely busy (and not with the usual stuff like cleaning house and grocery shopping and cooking multiple big meals to have all week), I made sure to make some time for experimentation.
My one and only curry recipe that I make at home is a peanut-butter curry chicken. OMG I love that stuff. YUM. It is near and dear to my heart, but alas, peanuts are a legume and thus off-limits all through the Whole30 Challenge (oh wait, that’s right, it’s over! woah…) and generally not acceptable even when we’re doing a 80/20 approach to Paleo. You know–80% Paleo, 20% whatever-we-want.
I guess Brent and I are pretty much sticking to Paleo (at least 80/20) from now on, with the occasional cheat day. This isn’t an official decision, just something that seems to be happening. So, still in this 100% Paleo mindset and knowing that we had approximately 1 pound of ground pork desperately in need of being used hanging out in the fridge, I decided to try creating my own curried ground pork recipe. We also had plenty of onion and garlic (typical), lots spices in the cabinet (also typical), and a few select veggies in the fridge (carrots and celery, also in desperate need of being used soon). 
I started by looking through a few recipes in The Curry Bible. Then, I rummaged through our pantry and sniffed (yes, literally sniffed) a variety of different spices next to the curry powder.  This may sound a bit silly, but I find it very effective: I hold the curry powder in one hand near my nose, and then in the other hand hold one or two other spices at a time; I then sniff all three more or less at the same time, somewhat waving them in front of my nose so I can get all the scents as close to simultaneously as possible. In this case, I feel pretty confident it worked out. 
And so, without further adieu, here is my new Curried Ground Pork with Carrots and Celery recipe…
~~~
Ingredients (roughly, in order of when you need them):
  • 1 and 1/2 tablespoons ghee
  • 1 medium onion, chopped (approx. 1 and 1/4 to 1 and 1/2 cup)
  • 2 cloves of garlic (minced or pressed)
  • 6-8 thin carrots, cut into 1-inch sticks (approx. 1 to 1 and 1/2 cups) 
  • 1 tablespoon fresh ginger, grated with a microplane or grater (or simply minced)
  • 1 pound ground pork
  • 1 and 1/2 cup coconut milk 
  • 1/4 teaspoon salt
  • 1 tablespoon curry powder
  • 1/2 tablespoon garam marsala
  • 1/2 teaspoon cumin
  • 3-4 celery stalks, chopped (approx. 1 to 1 and 1/2 cups)
*Note: This picture of all the ingredients includes one I didn’t list above: red pepper flakes. Originally, I planned to sprinkler a few in to give the curry extra kick. But as I cooked it, I realized that there was plenty of delicious flavor coming from the curry powder and other spices. So I didn’t use the red pepper flakes. If you do use them or some other heat/kick-adding ingredient, let me know how it goes!
Method:
1. Heat ghee over medium-high in a large, high-walled pan.
2. Saute onion, garlic and carrots in the ghee for about 2 minutes.
3. Add the ginger and ground pork. Sautee everything together, breaking up the ground pork with your spatula until the ground pork is nearly cooked through (most of it should not be pink, but it’s ok if a little is). 
I admit, I forgot to time step 3. I *think* it took about 6-8 minutes for the pork to become mostly cooked through, but please don’t quote me on that. Make sure you pay close attention and keep breaking it up and moving things around.
5. Add coconut milk and spices. Stir well to blend it all together.
6. Add the celery.
7. Bring the whole mixture back to a low bubble and then turn the heat down to medium-low.
8. Let it simmer on medium-low for 20 minutes. This will allow some of the liquid to reduce while all the yummy flavors congeal.
9. Serve in bowls and enjoy! OR let it cool, store in a sealed container in the refrigerator over night to let the flavors mingle even longer before eating it. 🙂
~~~
I taste-tested this throughout the cooking process to make sure I was adding just the right amount of curry and other spices, as well as to make sure it came out delicious overall. 
I think it’s awesome! And Brent did say it smelled amazing. 🙂 But Brent and I actually haven’t eaten it yet (even though I made it last night, just before we went out to dinner with friends who were visiting DC this weekend and wanted to see us). 
Why? Well, I planned for us to have it for dinner tonight. But, around 1 p.m. today, we got an invite to go to another friend’s cook-out this evening. So we had yummy grilled pork/onion/bell pepper skewers with veggies and other yummy sides. Tomorrow, we will “officially” get to taste this curry ground pork and I will be able to add a little note about how good (or bad–hopefully, not!) this recipe actually is.
If you try it, please let me know what you think! Feedback is key to perfecting recipes. 🙂