The best part about working from home… Part 1

I love working from home, which I do on average once a week, for a number of reasons. It saves me on commuting costs, I get to sleep in, I can work in my pjs if I want to, etc. One of my favorite perks is the ability to make whatever I want for breakfast. I’m in no rush to catch the metro the mornings I work from home, and that gives me the time to make something more creative than scrambled eggs and bacon (not that I don’t love those… I do! but variety is necessary sometimes).

Last week, I worked from home once and this week, twice. This post is the first of a 3-post series in which I’ll share three yummy breakfast creations that came out of my few extra minutes on those mornings. 🙂

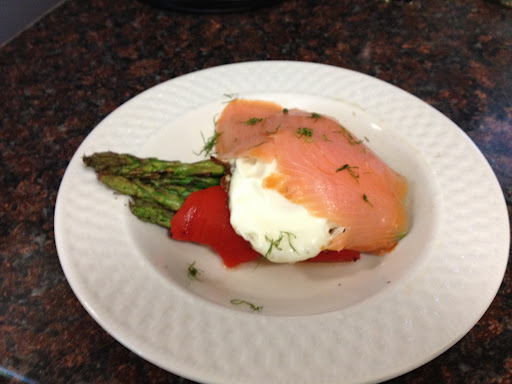
Poached Egg and Smoked Salmon over Roasted Asparagus and Red Bell Pepper

Ingredients

  • 4-5 asparagus stalks
  • 1 large, roasted red bell pepper from a jar or can (or a large, fresh red bell pepper)
  • 1 egg
  • 1- 2 thin slices of smoked salmon
  • a drizzle olive oil or ghee for roasting the veggies (I used ghee for my asparagus)
  • a small splash of coconut vinegar for poaching the eggs (optional)
  • a sprinkle of salt*, pepper and chopped fresh dill to taste

Method

  1. Peheat the oven to 400 degrees F.
  2. If you don’t have roasted red bell peppers in a jar or can, roast the red pepper for about 45 min (or until the skin is just about to blister; if you like it black, leave them in longer).
  3. About 10 minutes before the red bell peppers are ready, add the asparagus with a drizzle of olive oil or ghee on top to the oven for roasting.
  4. Meanwhile, bring a small pot of water to a light, rolling boil.
  5. Add a small splash of coconut vinegar if you like.
  6. Crack the egg into a small bowl and carefully drop it into the boiling water. If you want, you can take a small spoon and gently push the egg whites towards the egg yolk to keep it all together. I haven’t found this method to be particularly effective, but some people do.
  7. Wait 3 minutes for the egg to cook (I actually prefer to wait about 5 minutes because that will make the yolk just a little less runny).
  8. Using a slotted spoon, scoop out the egg from the boiling water, and set aside on a small plate or clean bowl.
  9. Once everyone has been cooked, pile up your plate (or bowl): first, the asparagus; second, the red bell pepper (I got fancy and tried to wrap my asparagus with the red bell pepper, but you don’t have to do that); third, the poached egg; fourth, the slices of smoked salmon; last, but not least, spinkle on your desired amount of salt*, pepper and freshly chopped dill!

*Note: Smoked salmon is naturally very salty, so if you use any at all, I caution you to use very little!

This recipe is Paleo-friendly, Whole30-friendly if you use a fresh red bell pepper or if you make sure your jar/can of roasted red bell peppers doesn’t have any additives, and 21DSD-friendly. Enjoy!

21DSD’s Sweetener Free Chocolate Almond Butter Cups

Even though Brent’s and my sugar detox is over, I still like to check the 21DSD program for delicious ideas. One recipe I resisted while doing the detox was the Sweetener Free Chocolate Almond Butter Cups. I was a bit skeptical, but I have to admit, these are pretty good!

Here’s my final product (I just had to take a bite so you could see the almond butter in the center, haha).

Ok, these are not perfect replicas of the Reese’s Peanut Butter cups. But I’m willing to bet they are a million times less unhealthy. And the flavors are awfully similar. The chocolate flavor is rich and dark. The sprinkle of sea salt is a perfect complement to both that and the savory almond butter center. In my opinion, almond butter is nearly as scrumptious as real peanut butter.

Anyways, these little guys are a tiny bit chalky, but otherwise very good. I think the next time I make them, I’ll play with the recipe a bit. For now, they will certainly satisfy my occasional craving.

As a disclaimer, for those of you who are disappointed that I’m not providing the recipe: I’m sorry, but Diane Sanfilippo of BalancedBites.com has a copyright on her 21DSD program, and as someone who’s involved in the publishing industry, I believe in respecting copyrights (most of the time… I’m only human). Plus, I had to pay $21 for the 21DSD program (it’s a PDF and it’s really quite handy), and if any of you really want to discover the awesomeness that is the 21DSD, you should buy it too. Or, if you just want an almond butter cup recipe, I’m sure someone has one online somewhere. When I get around to tweaking this recipe to suit my tastes–I’m also planning to try it with cashew butter, yum!–then I’ll let you all in on the secrets of making these sweet (but completely unsweetened) chocolate cups. 😉

Dairy-Free Mocha Latte

I’m working from home this morning and with the sudden onset of dreary weather (the past few days have been in the 80’s and bright, but this morning it was a chill 57 and grey out), I was in the mood for something warm and comforting. “Coffee?” I thought, “No… Maybe tea? No. Maybe, later.” I sighed, I wanted something but I wasn’t sure what. So I tidied up my breakfast dishes and started to make my way downstairs to my office.


Now, I know from experience that hot chocolate made with coconut milk and baking cocoa powder isn’t naturally sweet (I foolishly thought it might be the first time I made it, haha). So, I knew I would have to add something… sugar, maple syrup, stevia, honey…? I decided on raw honey because maple just didn’t make sense, sugar didn’t sound appealing at all (in fact, the past few months, every time I’ve had the opportunity to use sugar, I’ve felt somewhat adverse to it because of this vague sense that it’s “fake,” but I’m not really sure where that came from, lol), and stevia leaves a weird chemical taste in my mouth.
So, here we go… my attempt at a dairy-free mocha latte. 🙂
Ingredients and Tools (yeilds 2 6-oz mugs)
  • approx. 10 oz of coffee
  • approx. 2 oz of coconut milk
  • 1 teaspoon raw honey
  • 1.5 teaspoons baking cocoa
  • a blender (I actually used our MagicBullet, but you could use a regular blender, immersion blender, etc.) OR just a jar or cup with tight sealing lid
 Method
  1. Put all ingredients in the blender.
  2. Mix it up really well.
  3. Serve, sip and savor!

Then, I suddenly remembered we had coconut milk in the refrigerator, leftover from my attempt to make icing for carrot cupcakes this weekend. “I could make hot chocolate! Oh, but I could really use some caffeine… Mocha latte! Yay!”

Homemade Ghee

From what Brent and I have read, clarified butter and ghee are more or less the same thing; and what we’ve noticed is that ghee can be expensive and somewhat hard to find, depending on where you live. So, what did we decide to do? Make our own. 🙂


While Brent was at work on Saturday, I tried my hand at making ghee. It was really easy! Here are the two sources I used today to guide my ghee making adventure:


I clarified 4 sticks of unsalted butter (2 cups) and ended up with 13 ounces (1.625 or approx. 1 and 1/3 cups) of ghee. So far, I’ve used it in a number of dishes and I think its tastes and behaves just like the ghee we bought at the store. 🙂

This is the ghee we normally purchase at the store.
The butter cooking down.
After I spooned off most of the foam.
The straining is complete!
I was able to reuse the jar from the store-bought ghee and it was just the right size (13 oz).
The final product, cooled and sealed and ready for use! 🙂


Boneless Pork Ribs with Paleo Hoisin Sauce

As we already mentioned in O-M-G we’ve moved to MD, last week and this weekend were full of the moving insanity. So, even though we cooked some Paleo-friendly meals, we fell off the beaten path quite a lot. Thank goodness we’re back to our normal, healthy, Paleo-centered eating this week. I feel so much better than I did last week, and it’s not just because I’m not sore from lifting boxes and furniture anymore.

So, here is one of those delicious Paleo meals from last week…. It’s a spin off Norah’s Asian Boneless Pork Ribs, which we stumbled across while combing the web for something inspiring to do with our boneless pork ribs. We were pleasantly surprised by how tasty this was, especially since we made the hoisin sauce from scratch!

Ingredients

  • 2/3 cup homemade hoisin sauce
  • 1/4 cup pineapple juice
  • 2 tablespoons coconut aminos
  • 2 tablespoons coconut vinegar
  • 2 tablespoons sesame oil
  • 1/2 teaspoon fresh ginger, minced
  • 1 each garlic clove, minced
  • approx. 3 lbs of boneless pork ribs

Method

  1. Preheat the oven to 350 degrees F.
  2. Bake the pork ribs uncovered in a baking dish or pan for 60 minutes.
  3. Meanwhile, wisk the homemade hoisin sauce, pineapple juice, coconut aminos, coconut vinegar, sesame oil, ginger and garlic in a small bowl. Cover with saran wrap and set aside for later.
  4. Once the pork has baked for an hour, take it out and carefully drain the excess grease. (I asked Brent to help me with this–he kept the pork from sliding out with a big flipping spatula while I used oven mits to pick up and tip the pyrex pan until most of the grease drizzled out. Then, I carefully wiped the edges, sides and bottom of the pan to make sure grease wasn’t going to drip off and into our oven.)
  5. Pour the hoisin sauce mixture over the ribs.
  6. Cover the dish completely, then back for another 30 minutes.
  7. Serve and enjoy on it’s own or over a bed of califlower “rice”.
As you can see, our ribs were a little crammed into the baking dish. But it still worked!
The super yummy finished product!